Saturday, April 30, 2011

Cook, cook, cook! Part II


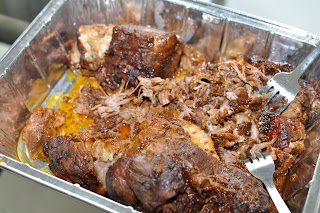
I decided to go even more simple for the second Easter party with my cousins, and made it a DIY dinner. I enlisted the help of my trusted slow cooker to make Pulled Pork Sandwiches. I have served pulled pork sandwiches in many of my parties and everyone seems to like it. I especially like it since it's not a lot of work, can be made ahead and you don't need any utensils to eat them! Win-win-win! I have always used this William Sonoma recipe, I'm sure there are many great recipes out there, but I really like this one since it's super simple and I usually already have all the ingredients on hand. The only thing I have omitted from the recipe is the molasses, not sure if it would have made a big difference. I made the pulled pork the night before (yes, after I washed all the dishes from the kiddie party, HA!), shredded the pork and put the sauce in the fridge, I love doing this (you would probably know this from reading my previous slow cooker posts), this allows all the fat from the sauce solidify, so I can easily scoop it out from the top.

I reheated the pork in the oven, and accidentally burned the top! Luckily, it still tasted okay after it was mixed with the sauce, if you find the meat too dry, you can always add some broth or water to loosen the sauce. Everyone assembled their own sandwiches with the pulled pork, coleslaw and even the toppings from the baked potato bar.

Pulled pork
3 Tbs. canola or corn oil
4 lb. boneless pork shoulder, cut into 3 equal pieces
1 yellow onion, finely chopped
3/4 cup cider vinegar
3/4 cup tomato ketchup
1/3 cup firmly packed brown sugar
1/4 cup light molasses
2 tsp. red pepper flakes
1 Tbs. Worcestershire sauce
1 tsp. dry mustard
1 tsp. salt
1 tsp. freshly ground pepper
Soft sandwich rolls, split and toasted, for serving   
  • Brown the pork
    In a large fry pan over medium-high heat, warm the oil. Add the pork pieces and brown well on all sides, about 12 minutes total. Transfer the pork to a slow cooker. 


Make the sauce and cook the pork
Pour off all but about 1 Tbs. of the fat from the fry pan and return the pan to medium-high heat. Add the onion and sauté until golden, about 5 minutes. Add the vinegar and deglaze the pan, stirring to scrape up the browned bits from the pan bottom. Stir in the ketchup, brown sugar, molasses, red pepper flakes, Worcestershire sauce, mustard, salt and pepper. Cook, stirring occasionally, just until the mixture begins to bubble. Pour over the pork. Cover and cook according to the manufacturer’s instructions until the pork is very tender, 4 to 5 hours on high or 8 to 10 hours on low.


Shred the pork and serve
Transfer the pork pieces to a platter. Using a pair of forks, shred each piece of pork, removing and discarding any large pieces of fat. Skim the excess fat off the sauce, return the pulled pork to the sauce and stir to combine. Serve the pork and sauce atop the sandwich rolls. Serves 6 to 8.
   
I whipped up this coleslaw with 1/2 head of cabbage, 1 carrot, 2 cups of mayo, 1/2 tbsp cider vinegar, 1 tbsp of sugar, 1 tsp of garlic powder and salt and pepper (The vinegar is heated with the sugar)

I also made my guests work hard on making their own side dish by having a Baked Potato bar, this is such a great and simple idea, I baked all the potatoes ahead of time and just set them out with a bunch of toppings.

Toppings:
Cheddar cheese
Parmesan cheese
Chives
Sour cream
Steamed Broccoli
Bacon
Sauteed mushrooms and onions
    Roasted garlic butter

The baked potato bar was also a big hit, and clean up was a breeze!

I swear there is a potato under all the toppings!


After a full week of eating leftovers (As suggested by my cousin, I used the leftover pulled pork and baked potato to make a shepherd's pie and it was soooo good), I'm ready to cook again, let's see what  I can come up with next week!

Cook, cook, cook!

After a week of recuperating and cooking strike, I am finally ready to do this Easter food/cooking post. I love planning parties and entertaining, especially now that I am a mom.  So last week, we had two back to back Easter parties at home and I cooked up a few dishes, here is a collection of the recipes! I chose recipes that were easy, can be made ahead of time and fed a big crowd.

For the kiddies Easter party, I chose dishes that were easy to make and also suitable for the 4 toddlers.  I have made this Deviled Chicken Drumsticks a few times, it is like my own version of shake and bake chicken, packed with flavor and with a short list of ingredients. These were a big hit with adults and the kids.


Deviled Chicken Drumsticks
  • 12 chicken drumsticks (2 1/2 to 3 pounds total)
  • 1/2 cup Dijon mustard
  • 3/4 cup panko (Japanese bread crumbs)
  • 3/4 cup grated Parmigiano-Reggiano (1 1/2 ounces)
  • 3/4 teaspoon cayenne
  • 3 tablespoons unsalted butter, melted
Preheat oven to 450°F with rack in upper third.
Pat chicken dry, then toss with mustard until evenly coated.
Stir together panko, cheese, cayenne, and 1/2 teaspoon each of salt and pepper. Drizzle with butter and toss.
Dredge each drumstick in crumb mixture to coat, then arrange, without crowding, in a buttered large 4-sided sheet pan. Roast until chicken is browned and cooked through, about 30 minutes. Serve warm or at room temperature.

This recipe is pretty self explanatory, my only tip is remember to keep your exhaust fan on while these are in the oven, they tend to get smokey in the oven since they are being baked at such a high temperature.

For the sides, I made Stuffed Zucchini Boats and Baked three cheeses pasta with bacon, both of these can be made ahead and baked in the oven right before serving. I learned this stuffed zucchini boat at one of the Loblaws cooking class I took years ago, and it had become a stable in our house. The zucchinis can be stuffed with anything you like, meat, veggies and different types of cheese.


Stuffed Zucchini Boats

4 Zucchinis
2 Eggs
1 cup of Italian breadcrumbs

1/2 cup of Parmesan cheese
2 Tomatoes, diced
Salt and Pepper to taste

Preheat oven to 375F.
Cut each zucchini lengthwise and scoop out the flesh with a melon baller (or a spoon). Chop the flesh into small pieces and set aside.

Mix the zucchini flesh with the eggs, breadcrumbs, cheese and S&P to taste. Fill the zucchini boats with the mixture and top with chopped tomatoes.

Bake for 15 - 20 minutes or until golden brown, served hot.


Baked three cheeses pasta with bacon
This recipe is very straight forward, the only key is not to over cook the pasta, since they will be baked again with the sauce. I replaced the sausages with bacon this time since our friend brought over a sausage dish for the party, I thought the bacon is great, but I think adding sausages would have been better. I really loved the addition of ricotta though! This was a crowd pleaser and also tasted great the day (days) after....

  • 2 Tbs. olive oil
  • 1 yellow onion, chopped
  • 2 garlic cloves, minced
  • 3/4 lb. chicken or turkey sausage, casings removed
  • 1 tsp. dried basil
  • 1 tsp. dried oregano
  • 1/4 tsp. hot red pepper flakes
  • 1 can (28 oz.) tomatoes in puree, tomatoes coarsely chopped and puree reserved
  • Salt, to taste
  • 1 lb. penne pasta
  • 1 1/4 cups ricotta cheese
  • 2 cups shredded fontina or mozzarella cheese
  • 1/2 cup grated Parmigiano-Reggiano cheese

In a large Dutch oven over medium heat, warm the olive oil. Add the onion and cook until golden, about 5 minutes. Add the garlic and cook, stirring, for 1 minute. Add the sausage and cook, breaking it up into bite-size pieces, until no longer pink, about 6 minutes. Stir in the basil, oregano and red pepper flakes. Add the tomatoes and puree and bring to a boil. Reduce the heat to medium-low and simmer, stirring occasionally, until thickened, 10 to 12 minutes. Taste and adjust the seasonings with salt.

Preheat an oven to 350ºF. Lightly oil a baking dish.

Bring a large pot three-fourths full of water to a boil over high heat. Salt the water, add the pasta, stir well and cook until barely al dente (tender but firm to the bite), 10 to 12 minutes. Drain well.

In a large bowl, toss the pasta with the sauce, the ricotta and fontina. Spread in the prepared baking dish and sprinkle with the Parmigiano-Reggiano.

Bake until the cheeses are melted and the tips of the pasta are crusty, about 30 minutes. Let stand for 5 minutes before serving. Serve hot.


To be continued......

Friday, April 22, 2011

A mid-afternoon pick me up

Oatmeal-almond-chocolate crisps, a great pick me up
We are hosting back to back Easter parties this year, and preparing for Tyler's first easter egg hunt with his little friends. I spent most of today cleaning and prepping for the parties, but I was running out of steam by the afternoon. I was dying for a chocolate chip cookie, but unfortunately there was none lying around. Luckily, I remembered reading a quick cookie recipe from one of my old Martha's Everyday Food magazine recently, and thankfully I already had all the ingredients.

This recipe is so easy, only requires a few ingredients, and it only took me 30 minutes from beginning to end (ie. from putting all the ingredients together to putting the cookie into the mouth).

Oatmeal - almond - chocolate crisps adapted from Everyday food

1/3 cup packed light-brown sugar
1/4 cup unsalted butter, melted
1 large egg
1/2 teaspoon vanilla extract
1 1/2 cups rolled oats (not quick-cooking)
1/2 cup sliced almonds
1/2 cup semi-sweet chocolate chips

1. Preheat oven for 350F. Line baking sheet with parchment paper or silpat.
2. In a large bowl, whisk brown sugar, butter, egg and vanilla until smooth. Mix in oats, almonds and chocolate chips
3. Drop mixture by level tablespoons onto prepared baking sheets, spacing about 2 inches apart. Flatten the cookies by using the back of a metal spoon
4. Bake until golden, 14 to 16 minutes. Store in air tight jar.

The cookies/crisps are light, crispy and not too sweet. It definitely hit the spot, I didn't feel too guilty eating more than one, they are particularly health food with all the oatmeal! LOL!

I am usually a chocolate chip or triple chocolate fudge cookie kind of girl, but I give these crisps two thumbs up! And since the list of ingredients is short and doesn't require a lot of prep time, I think these crisps are going to be a stable in our cookie jar.

Off I go with more cleaning and prep, stay tune for my Easter recipes in days to come!

Comfort food

My hubby is a true CBC (Canadian born chinese), he prefers burgers over fried rice, pizza over stir fries and hockey over ping pong (well, who doesn't?), but when it comes to comfort food, his #1 choice is actually congee. Congee is something all of us chinese kids grew up eating, it's basically a rice porridge, with various things added into it. It's the perfect thing to eat on a winter day, and the best thing to eat when you are sick. Congee is one of those things every chinese moms know how to make, but nobody really have a recipe for it. So when I got married, I decided to try to make it myself.

There is only two ingredients for the congee base, rice + water, all you really need to do is boil the rice in water until it reaches a porridge like consistency. Congee is not hard to make, but it's hard to make it well. And since hubby raves about his mom's congee, I really want to make it well, or at least somewhat comparable to his mom's version. After many failed attempts, I have finally mastered the art of congee, and hopefully Tyler will one day rave about his mommy's congee too!


Mommy Fi's Congee with shredded pork and thousand year old egg

1 cup of rice
1 tbsp of vegetable oil
2 tsp of salt
6 cups of water
1 large piece of pork shank (Chu Chin in chinese)
2 thousand year of egg (Chinese fermented eggs, can be found in asian grocery store, usually by the dry goods area)
1/2 cup green onions, chopped
Shredded preserved pork threads (optional)


1. Stir the rice, oil and salt together in a small bowl
2. Bring 6 cups of water to boil, then add the pork shank to boil for 30 minutes
3. Clean the eggs by removing the wood chips from the outside and cracking the shell, cut the eggs in small chunks, set aside
4. Add the rice/oil/salt mixture into the boiling pork water, simmer for another 30 minutes
5. Remove the pork shank, chop into small pieces
6. Continue to simmer the congee until the right consistency is reached, add water if the congee becomes too thick, should take another 15 - 20 minutes
7. Add the pork pieces, eggs and green onions into the congee and simmer for another 5 - 10 minutes
8. Season with more salt to taste
9. Serve hot with shredded preserved pork threads

The "secret" to making good congee is mixing the rice with oil and salt, it results in the perfect consistency, the rice is all dissolved, but still has a nice texture.  Add more water if the congee becomes too thick. Enjoy!

Saturday, April 16, 2011

Little crackers for little people

As a mommy to a toddler, I am always looking for healthy snack options for my little guy.There are tons of snacks for kids, however, they are either too salty/sweet to be healthy, but too healthy to be tasty. One of my little guy's favorite snack is the good old goldfish cracker, the little orange little fish that we all grew up eating. They are not especially bad for you, but I do find them a little too salty. In my search for a healthier option, I found this great recipe and blog.

Whole Wheat Goldfish (dog done & teddy bear) crackers adapted from Smitten Kitchen

1 1/2 cups coarsely grated cheese (the recipe called for cheddar, but I only had mozzarella, and it was just fine)
4 tablespoons  butter
1/2 cup  whole wheat flour
1/4 cup all-purpose flour
1/8 teaspoon onion powder
1/4 teaspoon garlic powder
1/8 teaspoon table salt (No need for too much salt, the cheese is already salty)


Preheat oven to 350°F. Combine all ingredients in a food processor, running the machine until the dough forms a ball, about two minutes.


On a lightly floured surface, using a lightly floured rolling pin, roll the dough out 1/8-inch thick.

Gently transfer crackers to a cookie sheet (I lined mine with a Silpat, but parchment paper would work too) with a 1/2 inch between them. Bake the crackers on the middle rack for 12 to 15 minutes, or until they are barely browned at the edges. Remove from the oven and set the cookie sheet on a rack to cool.

It was impossible to find goldfish cutters anywhere, so I settled on mini dog bone and teddy bear crackers instead. This recipe made enough to feed 4 hungry toddlers and a few hungry mommies too! It was a big hit at our recent playdate.  It was easy to make, I had all the ingredients at home already, and even cheaper than the bulk goldfish crackers from Costco! Although they are not as salty than the real thing, it tasted a lot of better, they were really cheesy and the texture was flaky and buttery.

I am never going to be one of those moms who serve only organic food, but at least it's good to know that with a little bit of work, there is healthy and tasty snack options for my little one! I am ready to whip up a new batch tomorrow!

This recipe is Tyler approved!

Vietnamese night

One of my favorite sandwiches in the world is the Vietnamese sandwich (Banh mi), yup, those little sub-like sandwiches packed in paper bags at your local Asian grocery store. They are cheap, usually around $1 - $2, with a layer of fat, pate and crunchy picked vegggies. Banh mi is really "in" in the food scene right now, different variations of Bahn mi were featured on Top Chef (thanks to Chef Angelo Sosa, I LOVE this guy), on the new food network show The Great Food Truck Race (hosted by Tyler Florence, and yes, my son is named after a celebrity chef!!! LOL) and also in David Chang's Momofuku cookbook.  So of course I had to try making it.

One would ask, why would I waste time and money to make Banh mi at home when you could get it for $2? But that is what cooking is all about for me, I am always looking for recipes to transform everyday food to something extraordinary. The first thing needed to assemble the Momofuku Banh mi is the chicken liver pate, that is the layer of meaty goodness in the sandwich. The hardest part of making this pate is finding the chicken liver, and thanks to my trusty Foody Mart, I found it with no problem. Making pate is much easier than I thought, this chicken liver pate made up of chicken liver, ground pork, shallot, garlic, and seasoned with five spiced powder, sugar and some fish sauce.

Everything were chopped and mixed in the food processor, and baked in a water bath.

The mixture was pretty gross looking!  


The pate loaf came out of the mold very easily, it wasn't pretty like a store bought pate (which was also mentioned in cookbook), but gosh, it was D-E-L-I-C-I-O-U-S! Hubby and I practically licked the loaf pan.
Yes, it looks like dog food, but it was soooooooo good!

The next part of the sandwich recipe was a ham terrine, but since this was meant to be for a weeknight dinner, I skipped this part and used a stored bought Vietnamese sausage instead. One thing I did managed to make was the pickled carrot and turnip recipes from the cookbook. Chang's recipe is super easy, consisting of rice wine vinegar, sugar and salt. The shredded carrots and turnips were pickled for 2 days, and the texture was perfect, crunchy, tart and sweet.

Can someone tell me why there is a baby on the kewpie mayo packaging?? WEIRD!


The Bahn mi assembly was also pretty easy, a layer of Kewpie Mayo, with the sliced Vietnamese sausages on top, a thick layer of pate spread on the other side of the bread, the sandwich is then baked for 15 minutes. Add the picked vegetables, and ta-da....The BEST sandwich ever! The mayo was oozing out of the side, and the pate had a really meaty flavor! It looks like a lot of work, but it was all worth the effort. I will definitely be making this again, and trying out the ham terrine next time!

To complete our Vietnamese night, I also managed to make some Shrimp summer rolls. These are very simple to make, all the components can be made ahead of time and assemble right before dinner. These summer rolls consist of shrimp, shredded pork, carrots, rice noodles and lettuce, all the ingredients (except for the lettuce) were cooked separately in boiling water flavored with fish sauce, sugar and black pepper.


Once all the ingredients are cooled, you can start assembling. The rice paper is soaked briefly in water to soften, each roll is stuffed with a slice of lettuce, a few pieces of shredded pork, 2 pieces of shrimp a few sticks of carrots and a small bunch of noodles. 
 
These rolls are refreshing and a perfect accompaniment to the sandwiches. I made a quick dipping sauce with fish sauce, water, lime juice and chili peppers to go with these rolls, they are simply addictive!
 
They taste better than they look, definitely need to take some photography lessons!

Friday, April 8, 2011

No food wasted!

My "thought process" for the week's menu usually starts with going through my cookbooks, cooking magazines or food blogs on the weekend, but sometimes, I start by opening the fridge and try to make something out of all the odd things I have. This week, I was able to turn in some of my son's "leftovers" into something yummy!

Plain yogurt was on sale a few weeks ago, so I stocked up, but Tyler couldn't finish it all, so I was stuck with half a tub of yogurt.  I was determined to find a recipe to use up the yogurt, and decided to do a version of this recipe from Bon appetite magazine. I didn't have any Aleppo pepper (don't even know what that is), so I used red pepper flakes (which is a stable in our house) instead. Tyler's Balkan style yogurt is pretty thick, so it worked really well as a marinate, and instead of making chicken skewers, I used chicken legs and baked them in the over instead. The end result was really juicy, I marinated them over night, and the yogurt really kept the chicken super moist. I would've liked the chicken to be a bit more spicy, but it works out since Tyler was able to enjoy it as well. Next time, I would slather the chicken with more of the marinade before baking them, the sauce was really tasty. This would be a perfect summer BBQ recipe!

Tyler's yogurt marinated spicy chicken legs
  • 2 teaspoons dried red pepper flakes plus 2 teaspoons  paprika
  • 1 cup plain yogurt, I used Balkan style
  • 3 tablespoons extra-virgin olive oil
  • 2 tablespoons red wine vinegar
  • 2 tablespoons tomato paste
  • 2 teaspoons coarse kosher salt
  • 1 teaspoon freshly ground black pepper
  • 6 garlic cloves, peeled, flattened
  • 1 thinly sliced lemon into rounds
  • around 15 chicken legs
 
1.Place the red pepper flakes and paprika in large bowl and stir in 2 tablespoons warm water and let stand until paste forms, about 5 minutes. Add yogurt, olive oil, red wine vinegar, tomato paste, 2 teaspoons coarse salt, and 1 teaspoon black pepper to spice mixture in bowl; whisk to blend. Stir in garlic and lemon slices, then chicken. Cover and chill overnight.

2. Place the chicken legs, with slight coat of marinade in baking pan, and bake at 375F for around 20 - 25 min. Pierce the meat with knife tip, if the juice runs clear, the chicken is done.


Another thing I stocked up on last week was strawberries! I couldn't resist, I love strawberry season...but Tyler is on a total strawberry strike, so I had to come up with a way to use up all the strawberries. Since we are going to have a few playdates this weekend, I decided to bake some cupcakes to share with my fellow mommies!

This recipe  for strawberry cupcake was super easy and the great thing is that I already had all the ingredients in the pantry. I am usually a chocolate kinda girl, but I think this recipe has totally converted me.  I still love chocolate, but this strawberry cupcake is light, not-too-sweet, fluffy and perfect as a mid-afternoon morning, midnight, eating one right now snack! The cupcake is great on it's own, but is divine with the icing. This icing recipe is surprisingly simple, and is adapted from the famous Sprinkles bakery.

Martha Stewart's Strawberry Cupcake

Ingredients

  • 1 1/2 cups all-purpose flour, plus more for pans
  • 1 1/2 cups cake flour (not self-rising)
  • 1 tablespoon baking powder
  • 1 teaspoon salt
  • 1 cup (2 sticks) unsalted butter, room temperature
  • 1 3/4 cups sugar
  • 4 large eggs
  • 2 teaspoons pure vanilla extract
  • 1 1/4 cups milk
  •  1 1/2 cup small diced strawberries

Directions

  1. Preheat oven to 350 degrees. Line 2 1/2 standard 12-cup cupcake pans with paper liners; set aside.
  2. Into a medium bowl, sift together flours, baking powder, and salt; set aside.
  3. In the bowl of an electric mixer fitted with the paddle attachment, beat the butter and sugar until light and fluffy, 3 to 4 minutes, scraping down the sides of the bowl as needed. Beat in eggs, one at a time, and then beat in vanilla. With the mixer on low speed, add the flour mixture in three parts, alternating with the milk and beginning and ending with the flour; beat until combined after each addition. Fold in strawberries.
  4. Divide the batter evenly among the prepared cups so that each is about two-thirds full, about 2 ounces each. Bake, rotating the pans halfway through, until the cupcakes are golden brown and a cake tester inserted in the centers comes out clean, about 20 minutes. Transfer pans to a wire rack to cool for 5 minutes. Remove cupcakes from pan and cool completely on wire racks. 
     
    Sprinkles' Strawberry icing (Adapted)
    • 1/2 cup strawberries
    • 1/2 cup of butter
    • 1/2 cup of vegetable shortening
    • Pinch of coarse salt
    • 3 1/2 cups confectioners' sugar, sifted
    • 1/2 teaspoon pure vanilla extract

    Directions

    1.  Place strawberries in the bowl of a small food processor; process until pureed. In the bowl of an electric mixer fitted with the paddle attachment, beat together butter and salt on medium speed until light and fluffy. Reduce mixer speed and slowly add confectioners' sugar; beat until well combined. Add vanilla and 3 tablespoons strawberry puree (save any remaining strawberry puree for another use); mix until just blended.


Saturday, April 2, 2011

I LOVE my slow cooker - Part II

It's been another long, busy week at work, so that means it was another slow cooker night! The last slow cooker recipe I posted was for beef ribs, but this week I decided to go for pork ribs! I actually had some pork ribs sitting in the freezer for a few weeks, so I decided to dig it back out and try to make something out of it! I really had no idea what recipe to use, all I know was I wanted to use these ribs and the slow cooker.  So I went into my pantry for some "inspiration", and saw the package of tzataiki powder my coworker got me from Greece (Poor guy, the tzataiki powder made his whole suitcase smelled like garlic, he actually had to wear garlic smelling clothes to his meetings!!), that's when I decided to make some Greek ribs....

Since most the slow cooker recipes I've used are with meat braising in a wet marinade, this time I decided to try out a dry rub, I wanted these ribs to be crusty outside and soft inside. This is what I came up with:


Greek style slow cooker ribs

10 Pork rib sections (individual pieces, not a full rack)
2 Tbsp Clubhouse Greek seasoning (I always have a bottle of this on hand, it's great for marinating, and also for Greek salad)
1/4 cup brown sugar
1 tbsp salt
3 tbsp olive oil
2 tsp dried oregano (extra Greek flavor)
2 tbsp garlic powder (I love this stuff!)
1/2 cup orange juice

1. Lay the rib sections into the slow cooker.
2. Mix all the ingredients into a paste, rub the ribs with the paste.
3. Pour the orange juice on top of the ribs, set the slow cooker to low for 6 - 8 hrs! Viola!


Again, I made these the night before, woke up to yummy meat smell, put the ribs in the fridge and went to work! This step is not necessary since the pork ribs were way less fat than the beef short ribs. So this could be made the morning of and set to cook during the day instead.

I served these ribs with steamed broccoli, fries (always have these in the freezer as well!) and of course the tzatziki sauce, which you can buy in any supermarket.

I was quite surprised by the texture of these ribs, they actually tasted alot like smoked BBQ ribs that had been on the BBQ for a long time. The outside of the ribs were slightly burnt and crusty, and the meat was fall off the bone yummy!! A definite success, and the prep time was so short, only took 5 minutes!


Enjoy!