Monday, August 8, 2011

Dinner in a bag!

Seafood is considered a "luxury" item for usual weeknight dinner, but it doesn't have to be. Seafood is actually one of the easiest and fastest item to make for dinner. The key is picking the freshest products but can also use in combination with good quality frozen items. My go to frozen seafood is frozen black tiger shrimp, I always have that in stock in my freezer, they are great for pasta and stir-fries.

In this recipe, the chosen seafood is steamed to perfection along with the cooked pasta in a parchment bag.  You might have seen this method of cooking in French cooking shows and think that it's too fancy smancy for you to try at home. But don't be fool, there is nothing fancy about this way of cooking at all, in fact, it's a fool proof way to steaming any type of seafood/fish, you really can't go wrong. The parchment bag creates an environment for the seafood to steam in it's own juices, and the yummy juices get absorbed back into the noodles, and everything just mingle in harmony! (Wow, I'm starting to sound like Giada de Laurentiis, never mind if you don't know who I'm talking about! =P) And the best thing is, there is no clean up, no pots/pans to clean at all!

Seafood pasta in a bag
The following ingredients are enough for one bag/serving, yes, it's a very big dinner portion! Hey, why not?!

5 pieces of mussels
5 pieces of clams
5 pieces of scallops (I used tiny bay scallops)
4 pieces of red snapper chunks (any firm fish like salmon, cod will do)
4 pieces of shrimp
1.5 cup of cooked pasta
1 tbsp of butter
1 clove of garlic, sliced
1/4 cup of canned chopped tomatoes (include the sauce with the tomato)
1/4 cup of chicken broth (white wine would be good too)
Extra virgin olive oil
Salt and Pepper to taste
Chopped parsley

1) Preheat oven to 375F
2) Clean all the seafood until running cold water, pat dry and set aside
3) Mix tomatoes, broth and garlic, then toss with cooked and drained pasta
4) Cut out a big piece of parchment paper (see picture) and fold it in half, then cut it into a half circle shape.
5) Lay the pasta in between the paper, place the seafood randomly on top of the pasta, put a piece of butter on top and sprinkle with salt, pepper and parsley.
6) Fold one side on top of the other, and crease around the edge to create a seal. This is an important step to ensure there is enough steam inside the bag to cook the seafood and also keep in the sauce.
7) Bake in oven for 20 - 25 min, it is ready when all the mussels and clams shells are opened (A bit difficult to see through the bag, but you should be able to tell when you take the bag out)
8) Drizzle with olive oil, serve with lemon, and enjoy with a glass of wine!!


Wednesday, July 20, 2011

Stocking your freezer - part two


It's getting late, and this heat is making me sleepy! I'm going to make this a quick one...another post on how I stock my freezer! We love dumplings around here, all kinds, steamed, boiled and pan fried! I'm always a bit weary about buying frozen dumplings, since I don't know what kind of meat they use, I prefer to make my own. Making dumplings are super easy, only a few ingredients and a little go a long way. They are good served with noodles, but equally good just on it's own! We love them and so does our little guy!

I made two different kind this time, one is a meat filled wonton and one is our stable pork and chives dumplings.

 Wontons
1.5 lbs of ground pork
10 medium size shrimps (chopped into small chunks)
2 stalks of green onions (finely chopped)
1 tbsp soy sauce
2 tsp Shaoxing wine (optional)
1/2 tsp chicken powder
1 tbsp oil
2 tsp sesame oil
50 sheets wonton wrapper

1. Mix all ingredients together, stir in one direction until they bind together
2. Put 1 tsp pork mixture in the middle of the wrapper. Fold one corner to the center, roll one more time.
3. Dab some water on one side of the wrapper and fold with the other side. Press to seal.
4. Freeze the wontons separately on a cookie sheet, and once frozen, they can be put into a freezer bag.

One of the ways to use these wontons is to make Wontons in Red Spicy Sauce, it is a classic shanghai recipe. It's nothing fancy, basically just cooked wonton mix in a spicy sauce.

Wontons in Red Spicy Sauce  
1 tbsp minced garlic
1 tbsp minced ginger
1 tbsp soy sauce
1 1/2 tsp chili oil
1 tbsp chinese black vinegar
1 tbsp sesame oil

1. Bring water to boil and put in wontons, boil for 10 - 15 minutes.
2. Mix all ingredients for the sauce together
3. Take out the wontons and put several into each bowl with a little boiling water
4. Mix a few tbsp of sauce with the wonton and serve.

You can adjust the taste accordingly, we like it HOT!


Pork & Chives Dumplings
1.5 lbs of ground pork
1 package of chinese chives (finely chopped)
1/2 cup of water
2 tbsp of soy sauce
2 tsp sesame oil
100 round dumpling wrappers

1. Mix all ingredients together, mix with a fork until the mixture is well blended, the mixture should be moist.
2. Put 1 tsp of mixture in the center of the wrapper, fold the wrapper in half, seal the edge with water.

3. Crimp the folded side to seal the side.  Freeze dumplings separately, and store in a freezer bag.

Portuguese Chicken - HK style


I started taking an interesting in cooking when I started dating hubby 10 years ago (OMG! 10 years already?), it started with some baking, then went on to a full blown obsession! As I have mentioned before, my inspirations usually come from other food blogs, cooking shows and cook books, but before all of these, there was my mom. My mom was also a working mom, but she always managed to put a yummy dinner on the table.

This week's recipe is definitely an inspiration from my mom, she always made this for my sister and I growing up, and that taste is always on my mind. I don't really know where the name Portuguese Chicken comes from, I wonder if it is really a Portuguese dish or not, all I know is if you grew up in Hong Kong, you must know about this dish. It is similar to curry chicken, but it is not spicy and the creamiest comes from the coconut milk. It is a really easy dish to make and perfect served with rice.

Portuguese Chicken - HK style 
Adapted from http://hungerhunger.blogspot.com/2007/08/portuguese-chicken.html


8 pieces of chicken thighs (cut into chunks)
2 brown onions, in small chunks
2 carrots, in small chunks
1/2 package of mushrooms (cut in half)
2 tablespoons of butter
2 tablespoons of all purpose flour
1 teaspoon of tumeric powder
1 can of coconut milk
1/2 cup milk
3 to 4 cups water
Salt and pepper to season


1. Mix the tumeric into the chicken, season with salt and pepper. Pan fry the chicken and onions in a little bit of veg oil for 4 to 5 min, add the potatoes, carrots, mushrooms, water and simmer 15 min.
2. In a separate pan, put in butter, then turn heat on to medium (so butter won't brown) and when butter has melted, add the flour, stirring well. It will form clumps but continue to fry it under low heat for 1 min. Do not let it brown.


3. Add the coconut milk and the milk a little at a time, stirring well, till a thick cream is formed. Use a whisk to eliminate any lumps.


4. Stir in the milk mixture into the pot with the chicken and vegetables once the chicken is cooked. Let the sauce bubble, then let is cook for about 5 min.


5. Spoon the mixture into an over proof dish, and broil (on HIGH) for 5 min or until top is brown.

Serve with rice!

Tuesday, July 12, 2011

Stocking your freezer - part one

To me, the key to stress free work night dinners is to have a well stocked freezer and pantry. I like to stock our freezer with tons of "meal starters", which makes cooking dinner after work much quicker. I won't lie, this takes time and planning, but the reward is worth it. I've prepared a few of our freezer stables in the past weeks, and one of them is Freezer Meatballs! This meatball recipe is slightly different than the spicy meatball recipe I've previously posted, this one is just as good and with a surprise in the middle!


Freezer Meatballs
Adapted from Martha Stewart

1/2 lb of ground pork
1/2 lb of ground beef
2 large eggs
1/2 cup Italian seasoned dried breadcrumbs
1/2 cup of cheddar cheese, diced
1 tbsp dried parsley
1/4 cup of milk

Mix all of the ingredients (except for the cheese) together until well blended.

Roll a scoopful (similar size to an ice cream scoop) of meat mixture into a ball, stick a piece of cheese in the middle, and roll it back into a ball to make sure the cheese is not expose.


Freeze the meatballs individually on a cookie sheet, once frozen, the meatballs can transferred to a freezer bag for storage.


This is such a time saver, all I have to do when I get home is to preheat the oven to 375F, place the frozen meatballs (right from the freezer) on an oiled oven proof dish. Bake for 25 minutes, and served with any homemade or store bought pasta sauce! Viola! This is a definite 30 minutes meal, move over Rachel Ray!! =P

And the beauty of having these meatballs handy is, they are good with pasta and also as a meatball sub. You can even make smaller versions for soups and little pastas for the kiddies.

Weeknight udon with caramel chicken


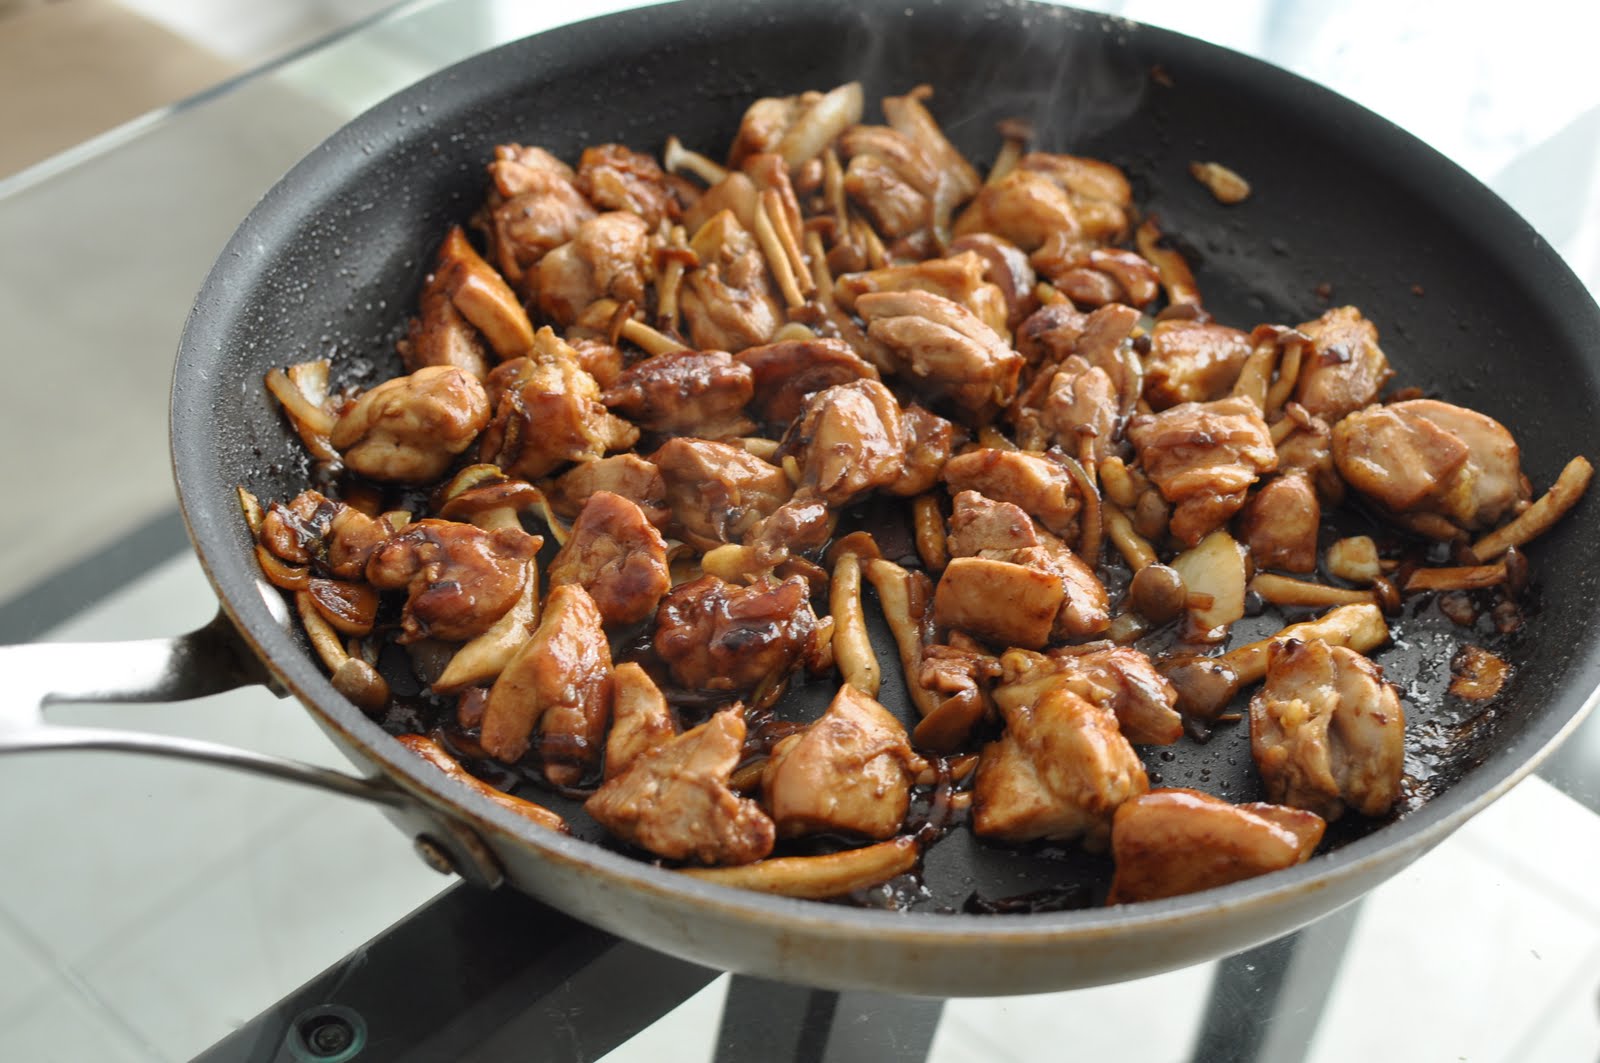
The reason why I haven't been blogging much lately is because between my several failed dinner attempts: Way too sweet teriyaki noodles (which my toddler splat out and kept saying NO NO!) and too sticky pad thai (AGAIN!), I really didn't have much to blog about. But I'm backkk, and with a few new yummy recipes in hand! This one is back to the basics, soup udon served with a caramel chicken. I bet you are thinking "what the heck is caramel chicken, sounds more like a dessert"! But caramel chicken is actually a way of cooking chicken that results in a sweet, deep flavored and very savory chicken.

Caramel Chicken

Ingredients
2 chicken legs, skinned and chopped into pieces
1 tbsp vegetable oil
1 onion, sliced
1 package of brown enoki mushrooms (or any type of mushrooms you can find)
3 garlic cloves, sliced
1/4 cup dark soy sauce
1/2 cup brown sugar
1/4 cup fish sauce


Fry the chicken pieces in the vegetable oil until lightly brown, remove from pan.

Reduce the heat to medium and fry the onion, mushrooms and garlic, cook for 5 minutes

Return the chicken to the pan, add the soy sauce and stir to combine. Cover pan and reduce heat to low and cook for 10 minutes.

Now, for the important part, increase heat to high, add the sugar and stir to combine, cook uncovered for 30 4 minutes, or until the sauce is dark and syrupy. Remove from heat and stir in fish sauce.


See, easy right?? It's delicious, it really is! The sugar is caramelized, it's slightly sweet and just the right balance with the fish sauce. I served this in a simple soup udon (miso soup based, udon noodles, my fav - fake crab meat and a soft boiled egg, YUM!), but this would be really good served with rice to soak up all the savory sauce. A great quick weeknight options for you and your family!

Thursday, June 23, 2011

Fish two ways

Summer and BBQ definitely goes hand in hand at our house, after weeks of bbq chicken, skewers and steaks, I was ready for something a bit lighter for dinner. Fish is a great option, I love fish but hubby is not a huge fan, so my mission is always to come up with creative fish dishes. Here are two go to recipes I have, both are easy (under 30 minutes from prep to the table) and tasty.


Fish#1: Kimchi Tofu Stew with Miso-glazed Salmon

This Kimchi Tofu Stew is a very loose adaption of the kimchi stew with rice cakes and shredded pork from Momofuku's cookbook.  Instead of his 14 ingredients (not including the 10+ ingredients used for the ramen broth), I used 6! I'm 100% certain that my stew is no where close to his tasty version, but it will do for a weeknight dinner! =)

2  tablespoons of vegetable oil
1 container of store bought kimchi
1 container of silken tofu
3 tablespoons mirin (Japanese sweet cooking wine)
Heaping 1 cup sliced scallions (greens and whites)
1 egg

1) Heat the oil in a soup pot over medium heat, add the kimchi and heat for 3 minutes, add 4 cups of water (or chicken broth).
2) Add the tofu, simmer for 5 minutes. Add the mirin and few grinds of black pepper. Taste the soup, and add salf if needed or more mirin if the soup is too sour from the kimchi.
3) Sprinkle with scallions, cook for another 5 minutes and remove from heat. Add the raw egg on top, the heat of the stew will cook the egg.

This stew is hardy and very satisfying, you can add other ingredients along the cooking process, such  as diced chicken or shrimp. To make this a complete meal, I served this with the ridiculous easy oven baked miso-glazed salmon.

Ridiculous easy oven baked Miso-glazed Salmon
1 thick piece of Salmon
1 teaspoon of sesame seeds
Marinade
1 tablespoon of white miso paste
1 tablespoon of mirin
2 teaspoon soy sauce
1/4 cup of water
1 tablespoon of chopped garlic

1 teaspoon of vegetable oil

Mix all the marinade ingredients together in a small bowl. Rub all sides of the salmon fillet with the marinade, place the salmon fillet on a lined oven pan, pour any leftover on top of the fillet. Sprinkle with sesame seeds.  Baked in oven (I used a small toaster oven) at 375F for 20 - 25 min (depends on the thickness of the salmon). You know the fish is done when it starts become flaky (test with a fork).

Fish #2: Shrimp stuffed Sole
Serves 4
Served with Roasted Garlic and tomato Linguine Alfredo  (Sauce is store bought by Classico, one of my fav)

This is another easy recipe and I love that it is a 30 minute meal, making this a great option for weeknight dinner. I picked up a few sole fillets this time, but I have tried this with Tilapia, Cod and even those mystery frozen white fish fillet at the chinese grocery store (I think they are Basa fillet). The stuffing options are endless, I usually use shrimps as the base ingredient and add some type of vegetables to the filling. I used broccoli this time, since that is what I had in the fridge, but spinach or red peppers would be just as good. If you don't like shrimps, you can try crab meat or even lobster meat. I think this is a great way to serve fish, it is quick but also elegant enough for a causal dinner party. Tyler loves it too, he said "yummyumyum"!


6 Sole Fillets
1/2 cup of finely chopped broccoli
2 tablespoon of mayonnaise
1/2 cup of chopped raw shrimps
Salt & Pepper to taste

Breadcrumbs

2 tablespoons of olive oil
3/4 cup of breadcrumbs ( I used panko, but any breadcrumbs will do)
1 clove of finely chopped garlic
Zest from 1 lemon

1. Mix chopped broccoli, shrimps, mayonnaise, salt & pepper in a small bowl.
2. Scoop a heaping tablespoon of  the mixture in the middle of each cod fillet, fold the fillet over and lay on oven pan with seam side down.
3. Cover the pan with another piece of foil, baked at 375F for 20 - 25 minutes. The fish is done when it turns opaque and the broccoli is fully soften.
4. While the fish is baking in the oven, heat up the olive oil in a pan, add garlic and cook till fragrant. Add the breadcrumbs and cook until it is slightly brown (watch the pan, it burns very quickly). Remove from heat and add the lemon zest, set aside.
5. Plate each pieces of fish with a tablespoon of breadcrumbs sprinkle on top (or as much as you like, the breadcrumbs is the best part, it also tastes great on top of the pasta). Serve with lemon wedges.

Hope you like these two fish recipes and will try it at home as well! I would love to hear any feedback!!

Wednesday, June 8, 2011

Easy Peasy

Hubby and I love trying new food and all kind of different cuisines. But it's often hard to just pick up and go to try the newest restaurant now that we have a toddler to take care of. Just because we can't go out to eat every night, it doesn't mean we have to eat the same thing every week. I love learning how to make all our restaurant favorites at home, some successful and some not (many many failed Pad Thai attempts later, I totally give up!). This week's menu includes Bibimbap, the yummy, hardy korean one pot rice dish.

Before I start to share my recipe, I just want to say that this is my version of the dish and it's not 100% authentic! The dish is super easy, it's more assembly than actual cooking, all the components can be made ahead and warmed before serving. The longest step is probably frying the beef, but even that only takes around 10 minutes!

Bibimbap
Serves 2

1 cup of cooked rice (or whatever amount you want)
1 package of sliced beef (the kind you buy for hot pot)
1 cup of korean kalbi bbq sauce 
Seasoned Bean Sprouts, Spinach and Carrots (see below)
2 Fried eggs

 Seasoned Bean Sprouts, Carrots and Spinach
 
1 cup of bean sprouts
1 brunch of spinach
2 carrots, julienne 

Marinade
1 tablespoon toasted sesame seeds
1 tablespoon dark sesame oil
1 tablespoon soy sauce
All three of these vegetable toppings are boiled separately, to save time, I boiled the bean sprouts first, then the spinach and carrots last, all in the same boiling water. 

Drain each ingredient separately and mix with one portion of the marinade (ie. do 3 portions of the marinade recipe and use one per vegetable). Set aside. You can use other vegetables like cucumbers or chinese mushrooms for the bibimbap.

Once all the vegetables are done and marinating, mix the sliced beef with the korean kalbi bbq sauce. This is a store bought marinade which is great to have, for beef, beef short ribs, chicken drumsticks and even salmon. It is readily available in any asian market, but if you can't find it, here is a recipe.
The sliced beef is so thin that it doesn't take long to marinate, a quick 10 min marinate is enough. Fry the beef while mixing and breaking the chunks apart, set aside when done.
Fry 2 eggs, sunny side up! You are now ready to assemble your yummy dinner!

Fill 2 bowls with cooked rice, place each topping (carrots, spinach, bean sprout and beef) on top of the rice, then top with the egg. Ta-da! All done!

The traditional bibimpbap is served with the korean red pepper sauce, but since we didn't have any on hand, we served it with sriracha hot sauce. The meat and veggies are so flavorful that you really don't need any other sauce. The oozing egg yolk tastes so good with all the salty toppings! 

It seems like there are alot of steps to this dish, but it doesn't take any time at all! It took around 30 minutes from start to finish, which makes this a good option for a weeknight dinner!